Thanks to Microsoft’s collaboration tools, accountants can easily update Business Central with data residing in Microsoft Teams Premium.
This article outlines five steps in such a process, as follows:
- Access “Recap” in Teams Premium.
- Normalize the data, if not already done.
- Upload the data to a Teams channel.
- Use Microsoft Fabric to review the data in Power BI for approval; and
- Import the data into Business Central from Microsoft Fabric.
1) Access Recap in Teams Premium
After your meeting concludes in Teams premium, choose “Recap” to find the required data to import into Business Central.
The example below features an Excel spreadsheet containing forecasted inventory quantities for the new fiscal year 2024, as composed and submitted by the board of directors. Please download the spreadsheet as shown in the example by navigating to the Recap tab and clicking into the appropriate record.

2) Normalize the Data, If Not Already Done
In order to import the spreadsheet into Fabric for use in the Power BI service, the data in Excel must be formatted as a table. In case the data is not already formatted as a table, please conduct the following tasks:
- Select the range of cells you want to format as a table.
- Within the “Home” tab’s “Styles” section, click the “Format as Table” button.
- Choose a style for your table.
- Within the “Create Table” dialog box, set your cell range.
- Mark if your table has headers; and
- Select OK.
3) Upload the Data to a Teams Channel
Within your Teams channel, upload the spreadsheet. As seen here, 2024 Forecast has been uploaded to a channel called “Business Central Demand Forecast Entries”: 
4) Use Microsoft Fabric to Review the Data in Power BI for Approval
To enter Power BI within Fabric, access the Power BI app in Teams as shown in the following scenario: 
Now that you have opened the Power BI Service within Microsoft Fabric, click My Workspace.
Then, click the “New” button and choose Semantic model:

Power BI’s “Semantic model” is a source of data that is ready for reporting and visualization in the Power BI Service.
Speaking of “source of data”, click the Excel button as seen below.

Next, browse to the saved “2024 Forecast” spreadsheet in the “Business Central Demand Forecast Entries” channel and click Import. 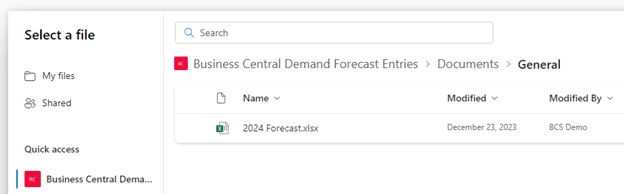
Now that the data has been brought into Fabric, click Explore this data > Create a blank report:

Just as in the Power BI Desktop application discussed in previously published blog articles, the Power BI service allows access to Visualizations and other tools for creating valuable charts and other business objects.
The example below shows charts based on three Visualizations – Clustered column chart, Q&A, and Smart narrative.
Such charts prove useful in determining if the data provided warrants importing into Business Central’s forecasting tools. 
5) Import the Data into Business Central from Microsoft Fabric
The final step is to open “Demand Forecasts” by typing it in the global search: 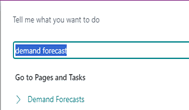
After clicking “Demand Forecasts” within the “Search” window, find the Demand Forecast that you want to update based on the data reviewed in the Power BI service.
Next, click Demand Forecast Entries. 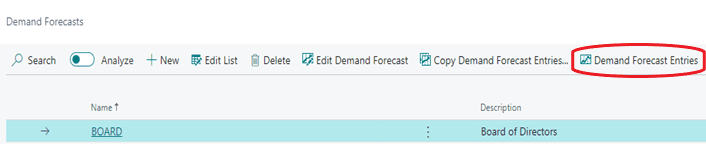
Click the “Share” button:
Then, choose “Edit in Excel”: 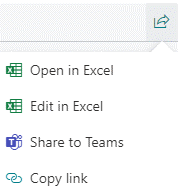
From within the resulting spreadsheet, browse out to the data within Power BI by navigating to Get Data > From Power Platform > From Power BI. 
Upon finding 2024 Forecast in the “Power BI Datasets” pane on the right, choose Insert Table:

On the right-hand side of Create Table, that the data is going to “pull” from the table held in the Power BI service. 
Upon clicking Insert Table, the data from Power BI will be placed into a separate tab within the Excel workbook. In this case, the tab is called “2024Forecast”, as shown below.
![]()
From here, you could simply copy and paste the data from 2024Forecast to Sheet1. A better alternative, however, is to use an Excel macro to automatically conduct this work.
The next information below discusses how to create such a macro.

After clicking the “Record Actions” button in Sheet1 shown above, you will choose to start recording. Excel will record your copying and pasting from 2024 Forecast to Sheet1.
Specifically, you’d copy and paste into Sheet1’s “Item No.” column, “Forecast Quantity (Base)” column, and “Forecast Quantity” column.
After clicking Stop recording, click Publish to update the “Demand Forecast Entries” window of Business Central:
 You may save the spreadsheet and use it again if you ever need to update Business Central’s forecast in the future, simply click “Enable Content”, upon reopening the spreadsheet.
For more information about how Bond Consulting Services can maximize your Dynamics 365 investment, please reach out to us at Sales@BondConsultingServices.com or click here to schedule a free consultation with one of our Dynamics experts.
You can also visit our YouTube channel for helpful videos about every aspect of Dynamics 365.